Configuring Your Virtual Network Interface
By default when you install the Virtual Network you will get a default Virtual NIC interface called RtVirtualNIC for use with the RT-TCP/IP Stack. This interface can be used as is out of the box with no configuration.
NOTE: By default, the RTX64 Virtual Network Interface is disabled upon installation.
NOTE: Only one Virtual Network can exist at a time.
To recreate the default RtVirtualNIC interface or create a new interface through the RTX64 Control Panel, follow the steps below.
Steps:
- Open the RTX64 Control Panel:
Windows 10 and Windows 8.1:
From the Windows Apps menu, navigate to the RTX64 Runtime section and click the Control Panel tile.
Windows 7:
- Click the Start menu and then choose Control Panel.
- In the Windows control panel, select the System and Security category, and then click RTX64.
- Click Configure the RT-TCP/IP Stack.
- Click Manage interfaces and filters. If an interface for the Virtual Network already exists, disable it now.
- If you do not already have an RtVirtualNic interface, on the Manage Interfaces and Filters page, click the Add button.

The Add Interface dialog appears.
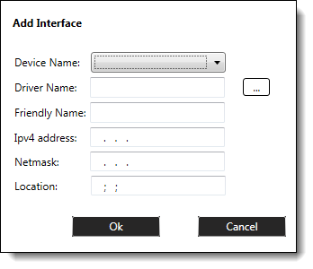
- RTX64 devices are listed in the Device Name drop down menu. Select the RTX64 Virtual Network Interface from the drop down.
- The proper RTX64 driver should be selected. However, you can change the driver by clicking the Browse button to browse for a driver.
- Specify the following:
- The unique Friendly Name of the interface
- Set the IPv4 Address of the interface to the IP address that you wish to use.
- Set the Netmask of the interface to the netmask that you wish to use.
- Click OK. The interface for the selected device appears under Interfaces. By default, interfaces are enabled when they are added. Properties for the selected interface appear in the Properties box; not all interface properties are available for the Virtual Network, and when they are not supported they will be disabled
NOTE: If you are not a member of the RTX64Administrators or RTX64Users groups, you may encounter an error. For more information on user groups, see User Groups and Access Permissions.
- Restart the RT-TCP/IP Stack for your changes to take effect. If you plan to make additional changes that require a restart of the Stack, make all of the changes first and then restart the Stack when you are finished.

IMPORTANT! The Subnet mask you specify in the RTX64 Control Panel must match the Subnet mask specified in Windows (see below).
IMPORTANT! The RTX64 Virtual NIC cannot share a Subnet mask with a converted physical Network Interface Card.
